
Are your flowers all gone until spring? Can’t get flowers to grow at all? Try making some of these colorful recycled creations — and since they are made from aluminum cans, they’re guaranteed to stay pretty for a long, long, long time (just don’t step on them).
We’re doing a craft activity at school tomorrow, helping kids make holiday gifts out of recycled materials. I’ve been testing the process — seeing what kinds of simple things the kids can make with aluminum (we’re doing other crafts, too). These flowers, wreaths, and ornaments are super easy to make, and for the younger kids, we can simplify the steps even more. Though I didn’t take pictures of my methods along the way, I’m including how-to-instructions below.
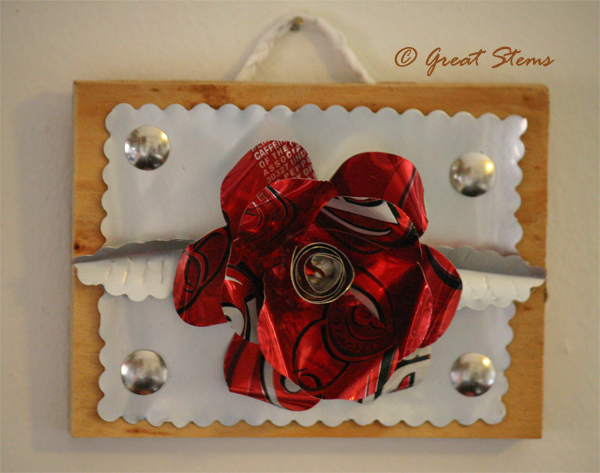
The above flower was made with six heart-shaped cut-outs, a thumbtack pinning them in the middle, a thin strip coiled and glued in the center, an aluminum can background cut with scalloped scissors, and a piece of scrap wood from our garage. Once you’ve pinned the hearts together, spread them like a deck of cards and gently work them upward to get the flower shape (also, slightly bend the petal tips back for added effect). The hanger is braided strips from a grocery shopping bag, hot-glued to the back of the wood.
Aluminum cans are easy to cut with scissors, believe it or not. Make a small hole with the scissors, then cut the top and bottom of the can off. A single slice down the side reveals a nice rectangle to work with. To take away the curl, just lightly drag the rectangle along a table edge in the opposite way of the curl.
Materials needed for these projects:
Aluminum cans
Scissors
Glue (tacky or hot-glue)
Something to put your artwork on, such as magnets, craft sticks, scrap wood, old CDs
String, twine, strips of shopping bags, raffia, or yarn (or even paper-clips, for hanging purposes)
Old ballpoint pen without ink
Also useful:
Thumbtacks (depending on the project)
Die-cut punches (I used a 1-inch circle shape and medium-sized heart shape — found at craft stores)
Scalloped-edged scissors or similar
Hole punches
Ruler (for making quick, straight folds)
Toothpicks, pencils, or other objects to coil foil around
I did have to purchase the thumbtacks, but everything else I had on hand. You don’t have to use die-cut punches but it is soooo fast and works on aluminum very well — it’s nice when you need lots of consistent shapes. Alternatively, create a template on some thin cardboard and trace the outline repeatedly onto the aluminum, then cut the shapes out by hand. I also now have some purchased magnets, so the kids and I will probably have some fun with those.
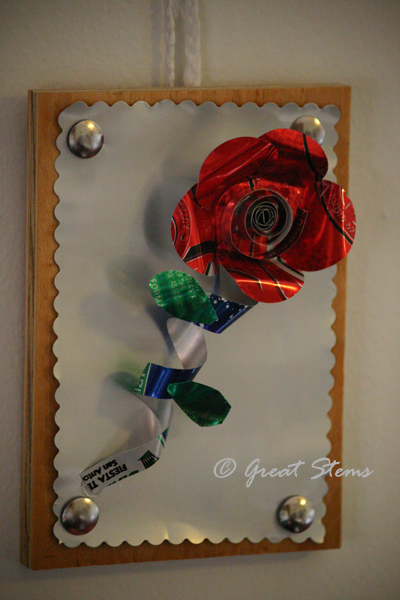
This flower was made with five one-inch circles glued to a sixth circle “base.” To get the 3-D effect, simply gently bend the petals upward and give them a slight backward bend at the top of the petal. Coil a strip for the stem and another for the flower center, and make some simple leaves.
Keep in mind that any of these flowers can easily be used to make a magnet, planter garden (on craft sticks, etc.), or a bouquet. There is also a large variety of can colors out there — you can modify your design to make sunflowers, mums, etc. I intend to experiment with this, too, but I didn’t have any other colors on hand.
Here is a very simple flower, something the younger kids might have an easier time with.

The petals are 1-inch circles, and the stem is made of strips. The petals can be glued flat, and kids can either cut out leaf shapes or make the coiled ones shown in the picture. To make the quilled leaves, cut a thin strip of aluminum and coil it tightly (perhaps around a toothpick), giving a gentle pinch at one end. You can also make entire flowers from quilling strips of foil.
Ornaments are super easy to make and very satisfying. They look great on a tree with lights and have the bonus of being “double-sided.”
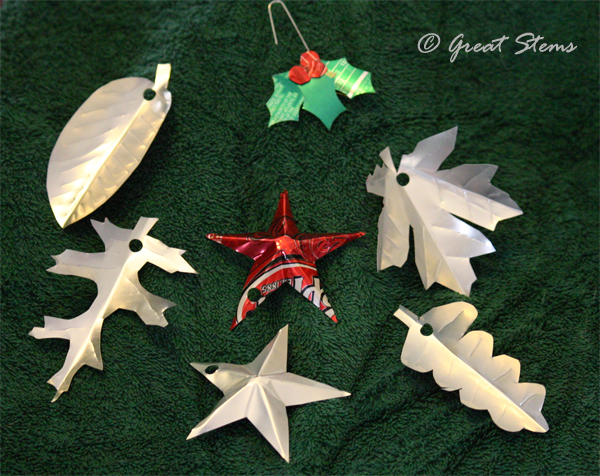 To make the leaf ornaments, simply trace a leaf shape onto the aluminum and cut it out (creating a cardboard template is great for repeated uses). To create a fold, press a ruler over half the leaf shape, along the midline, then gentle fold up the uncovered side. Use a non-working ballpoint pen to create the veins — voila, easy but very effective texture. You can also use scalloped scissors to give additional leaf effects (see wreath below). The star ornament is just a basic star cut-out; the 3-D effect is made with straight folds from every point, with gentle pinching to guide the shape as shown. The holly ornament is made from simple cut-outs of hand-drawn leaves and berries; it’s glued to a paper clip.
The leaves can be used to make a beautiful wreath, glued to an old CD.
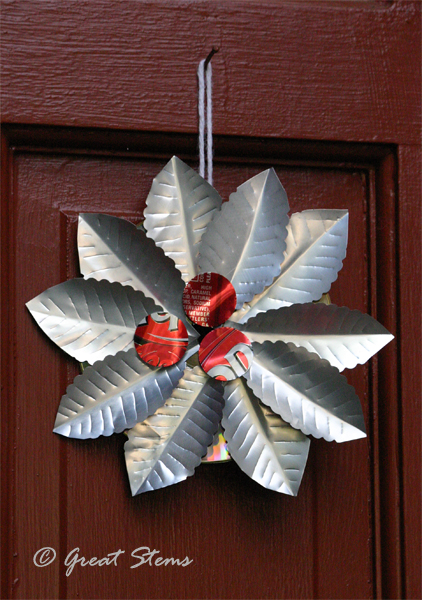 You can see the scalloped edges on the leaves here — what a difference it makes — very much like leaves found in nature. A hot-glue gun made this a fast craft, but tacky glue should work fine. The CD is used silver-side up.
My boys are doing aluminum can crafts of their own, from ornaments to dragons to snakes. I hope to be able to share photos. And today I’m working on plantable seed ornaments made from recycled paper, working to make the process kid-friendly and easy. Stay tuned for more earth-friendly holiday projects!
What a good idea. I would think both boys and girls would enjoy making them and what a great use for aluminium cans (and old CDs)
So clever Meredith! I especially love the last one – they would be beautiful catching the lights on a Christmas tree!
Very cool. Love the wreath. But I’ve got to ask — can you cut yourself working with the aluminum? I might try to make some of these when we are visiting our grandsons for Christmas 🙂
As long as you cut smooth lines, you should be fine. We just worked with 40 kids today (ages 6 to 11), and none of them cut themselves. The hardest part is simply cutting the tops and bottoms off the can, so I recommend an adult do this part, and then trim off any straggly bits. Depending on the ages of the kids, they can either help cut out the shapes or simply glue the shapes that you cut out for them. The kids at school absolutely loved working with the aluminum. They felt like they were metalworking, even though the aluminum is thin enough to cut with even kid scissors. Great fun! Good luck!
I like the christmass tree decorations.
What creative ideas you’ve designed with something that would just be thrown away!
Thank you for sharing such a wonderful idea. The flower in red and those leaves in green look simply amazing and yet simple.
Thank you for sharing such a wonderful idea
Lots of fun putting materials like these to use!