
It took longer than I had planned (doesn’t everything), but the bird bath is finished! Well, it’s got another day to cure before I put water in, so maybe it’s not technically finished, but close enough for pictures! Here’s the After Bird Bath.
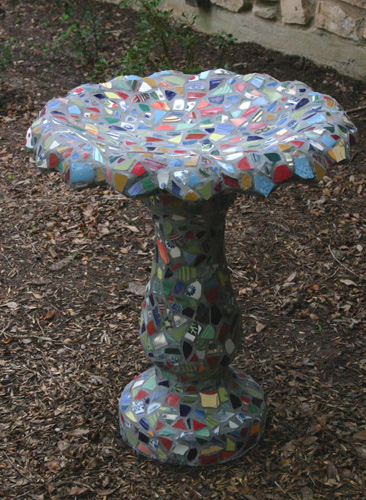 I apologize for the darkness of the photos — there’s a thunderstorm brewing out there. I’m crossing my fingers for rain, even though the bird bath hasn’t finished curing. I might go out and put a temporary cover on it just in case.
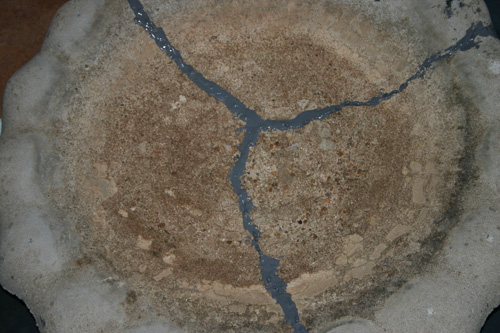
Here’s the Before Bird Bath. We got this for free from someone on Craigslist. It had cracks in the top, was ugly, and was barely functional.
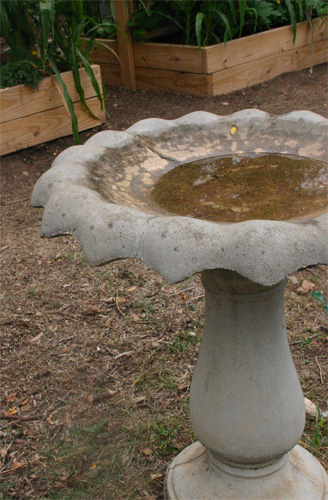 During a recent rainy week, my exterior painting got put back on hold, so I decided it was a good time to make the bird bath prettier. And because life likes to play its little jokes, the top part broke into three pieces when we moved it indoors, adding another day’s delay in getting started on the main project.
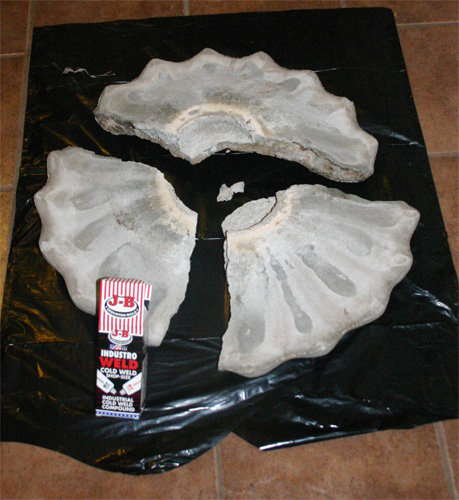
I searched for a non-toxic adhesive that was strong enough for concrete and found JB Weld Cold Weld Compound. I spoke to a person at the company to make sure it was the best choice for repairing a birdbath, and she was confident that it was safe enough for my feathered friends and strong enough to hold the heavy concrete together. So I glued the pieces back together, and I’m pretty certain that if the bird bath breaks again, it won’t be in those glued cracks, but elsewhere in the concrete.
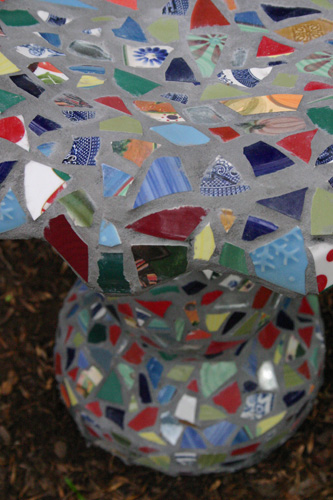
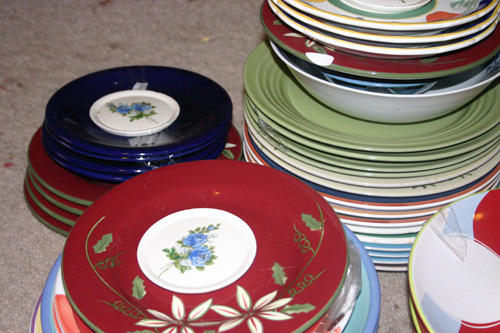
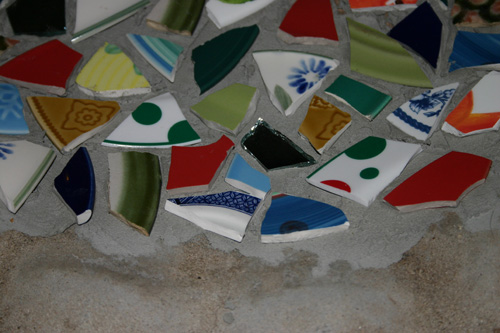
 For the pieces, I spent several days scouring the local Goodwill outlet for colorful plates I could break. What I learned while breaking them was that some plates are just too thick and porous to be useful, so in the future I will be more selective in my choices. I originally was going for color, but then later I started going for a certain thickness. Ideally all the pieces would be similar thickness, but I had to work with what was available.
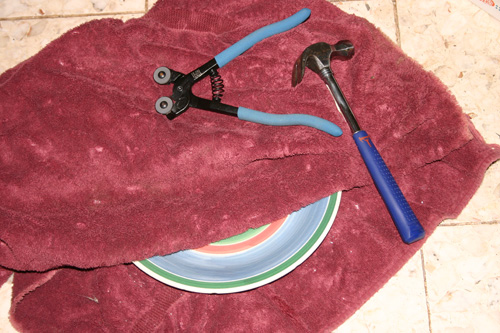
I used a hammer to break the dishes in an old towel (with safety goggles on). The towel keeps the pieces contained. I kept tile cutters on hand in case I need them to trim a piece. But mostly I used the hammer.
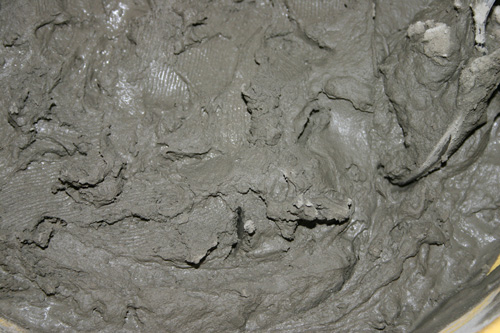
Then came time to adhere the pieces to the bird bath. I did my best to research what materials to use, but there’s a lot of conflicting information out there. Ultimately I decided to use thinset to adhere the mosaic pieces to the concrete. I chose Versabond because it was readily available and says that it’s appropriate for outdoor use, but some people said they don’t like it. So time will tell. Wear a dust mask when mixing this product, due to the cement dust. Follow the bag instructions — the goop will be thick like peanut butter.
Depending on the area, I used a putty knife, a plastic knife, or my gloved fingers to spread on the thinset, then placed the mosaic pieces at random, working in small sections at a time. Other times I backbuttered the pieces (spread thinset directly on the back of the mosaic piece) so they would stick better. The downside to using thinset is that it sometimes would be thick between the pieces (where the grout also needed to be), but I tried to pay attention and make sure that the thinset wasn’t too high up.
This process took a couple of days. It’s a lot of work making something look random! Also, I ran out of thinset toward the end and had to buy more. Should have bought the big 25-lb bag.
I don’t have pictures of the grouting process, because I didn’t want the camera near the mess, and I was mostly alone when I worked on this project. But I chose a sanded grout, though again I did my research. I ruled out using more of the thinset as grout.
When mixing the grout (again, with mask), the texture of the goop is different — it will be less thick and wet than the thinset was, and it will be more gritty. Follow the instructions on the container, then smear it into the crevices between the pieces. After the recommended number of minutes, take a damp sponge and begin to clean up the pieces — the grout will become smoother between the pieces. I had to do this several times as I went along, and then, grumble, I ran out of grout (right toward the end again) and had to rush to the store to get more. Should have bought two boxes from the get-go. The grout is a messy process, but it’s very rewarding when you see the finished look.
To seal or not to seal? I searched and searched for information, but the gist of it is that grout sealers are almost all toxic and will break down over time when in water. Since this is for a bird bath, bird health is my main concern, so at the moment I have not sealed the bird bath. I found only one sealant that is considered semi non-toxic, but the woman I spoke to at the company said that it will break down in water over time. A woman at a grout company said she didn’t think I should seal it at all. I’m going to read more, but I’m erring on the side of caution for my birds.
The After Bird Bath is outside near a yaupon and a window. The birds can enjoy a safe spot for splashing, and I can enjoy watching the birds. And now I get to choose plants to grow at the base! Nothing too big, so cats won’t hide nearby.
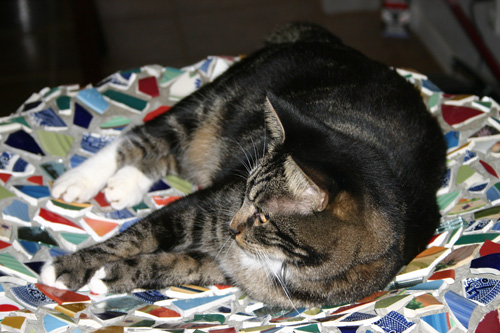
While I was working on the bird bath inside the house, my cat kept wanting to lay in the top and dream of catching birds, as if I built this for her. Wrong, Tooga!
 Here’s a general list of materials I used:
Concrete bird bath
(JB Weld for repair if needed)
Versabond
Bucket and tool for mixing
Putty knife and/or other knife for spreading
Sanded grout (when pieces are more than 1/4 in. apart)
Hammer
Old towel
Dishes to break, or tile pieces
Tile cutters if necessary
Water for mixing and cleaning up
Sponge (not too big)
Rags or cheesecloth for buffing
Safety goggles
Dust mask
Rubber gloves
Paper towels for handy clean-up
It was a long project, but we love the results. Hopefully the birds will, too!
THAT is awesome!! I must’ve been reading your mind today, I’ve been on a hunt for bird bath designs that I can build!
I love it!! what did you think of the goodwill outlet? ; )
Very impressive! Wow, what would we all do without Craig’s list???
Wow, Meredith. I am so impressed. Your creation is just beautiful. I’ve always wanted one of those and would never be able to do that. You must be very pleased. I’m sure all the birds will say thank you!
Joseph, thank you — I’m planning on creating . Next time I do another concrete one, however, I’d start with a different plan in mind. For one thing, a simpler bird bath (round instead of flower-shaped top, straight pedestal instead of fat in the middle) would make the mosaic process a lot easier, and keeping the mosaic pieces much farther apart would allow me to use cement for the whole birdbath instead of having to use grout. Of course, beggars can’t be choosers, and the flower bird bath was FREE!
Diane — that outlet is not for everyone or everything (and can be kind of dangerous with all the icky stuff and broken glass), but there was plenty of stuff to choose from. I’m happy that the prices were much better than at the regular Goodwill, which despite it’s purpose tends to be pricey for the used items you’re buying. The outlet was perfect for my purposes, and I found a few other things for the yard while I was there. And Nolan found something for his Halloween costume — you’ll see it in another month!
Charlotte — yep, I love Craigslist. I haunt the Free section. It’s where I also got all the rocks that I used to build my pond, and many of my container plants!
Diana, it was easy but tedious. You absolutely could do it, too. When the top portion broke the way it did, I almost gave up completely before I started, but I’d already collected all the plates to break, so I was determined! The challenge was that I couldn’t move the two sections of the bird bath by myself, so I kept having to get help whenever I needed to change locations.
This is just beautiful, Meredith! I really like the look…and it’s very cheerful looking with the bright colors! You seem to have found so many colorful plates! You definitely did a fantastic job! Thanks for sharing your procedure and photos! I really do hope it will never crack again!
What a fun project! It looks great (and makes a lovely cat bed, hee)!
That looks like it was a neat project, even if it was messy 🙂 It turned out beautiful.
The bird bath turned out beautiful and will certainly add to your garden. I think your efforts regarding the use of toxic materials were well founded, after all it is for those birds. I am struggling with whether to seal the outside of my untreated raised beds with something like Thompsons Water Seal or a stain, or just leave it natural.
A thing of beauty and a joy forever! Would have expected wall tiles, but the plates are much more fun. More texture too.
What a fabulous project. What a find on Craig’s list and those lovely plates. Imagine how much a bird bath like that would cost at a garden shop! I don’t think there is a seal that works well enough on horizontal surfaces so you were smart to keep away from doing that. I have mended any number of pots and also the base of my bird bath just using construction adhesive. Seems to work well.
I love it! You did a wonderful job. I have been looking for a bird bath for some time and can’t find one I like at a descent price. It will look so pretty outside. Very creative!!!
Meredith,
Lucky birds get to sip out of this work of art, and lucky kitty too, gets to try it out. Is is dreaming of catching birds for snacks?
Thanks for the instructions, maybe someday! I had a bear break a bird bath, I wish I would have saved the pieces and used the cold weld stuff.
Rosey
What a great project! A very good use of old materials to make something nice and functional. Craigslist is a great place to find stuff like that isn’t it!
It turned out so well! You are most enterprising to put that broken top together and drive on. It’s beautiful!
oh man! i think i have another project on the horizon! haha! i love it!
Oh Meredith, this is most excellent! Your step by step instructions are well written and clear. I have thought about doing something with some china that was broken during our last move. Thanks for the advice about the thinset, thickness of the pieces and grouting. It sounds like we need to have plenty of thinset and grout on hand before starting too, what a pain to have to go to the store like that. The finished product is amazing and the cat in it cracked me up. Thanks for an all around entertaining and educational post! 🙂
Frances
Frances, now that it’s all done, I have plans to make something else. What that will be, I have no idea, but I have lots of thinset and grout to spare now!
Meredith, this shows that you have tremendous patience and dedication! At breaking the first plate, and seeing one small chard and the number of pieces yet required, I would have contemplated large square pieces that required whole plates! Excellent work!
FANTASTIC! What an incredible job you did. I loved seeing the pictures from start to finish. You are so talented and I KNOW that took a LOT of work from the job our daughter did for me on the mosaic birdbath she made! Congratulations on your work of art! It’s BEAUTIFUL!
Wow, this is a great idea. My mother’s house burned last year and she lost all of her china and dishes that belonged to her grandmother. The burn site has yet to be cleaned up so I am going to sift through the rubble this weekend and find pieces of the broken dishes, crystal, vases, ect. that she lost. I’m going to surprise her with a birdbath for Mother’s Day for her new house!!
I think that’s an excellent way to make something wonderful and beautiful out of a terrible event — I’m sure the birdbath will become quite dear to your mother. I’m so sorry to hear about the fire, and I sure hope you find the pieces you need. Good luck!
Pingback: Making a Mosaic Bird Bath « Everydayclimb's Blog
Pingback: Growth of Epic Proportions | Great Stems
Hi, I just snagged a bath exactly like this at Goodwill for $30. Not sure I’ll mosaic it or not. Did my tiny bathroom floor recently so I have the experience 🙂 …somewhat on a time restraint so maybe later. Thanks for this lovely inspiration for a future endeavors. Blessings.
There are always alternative ways to perk up a plain birdbath. Even just gluing on a cute ceramic bird might be enough! 🙂 If mine hadn’t been completely cracked into pieces, I would have considered something easier!