Recently in crafts and garden whimsies Category

Easter Rocks... And I Mean That Literally

| 10 Comments

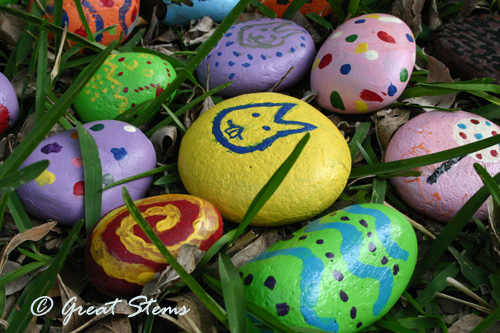
This year my kids got rocks for Easter.

easterrocksb04-24-11.jpgLots and lots of rocks.

easterrocksj04-24-11.jpgAnd furthermore, we made our kids work to get them. They had to help paint said rocks. And that's why our Easter rocks didn't always look so Easter-y.

easterrocksk04-24-11.jpg easterrocksl04-24-11.jpg
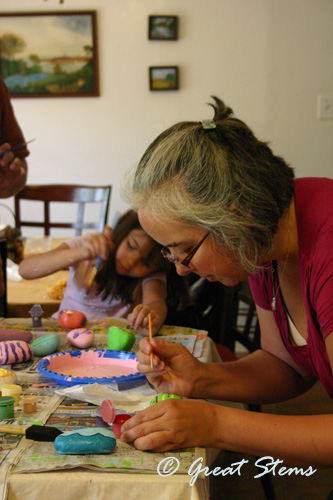
Nonetheless, we painted our Easter rocks with gusto. See, the problem with traditional egg hunting is that it only happens once a year, unless you play "find the stinky rotten egg" in the summer after you couldn't find all the hardboiled eggs in the spring. That's why we decided to paint rocks instead, so that we could enjoy year-round colorful-object hunting. I know, I know -- pure genius, right? Our friends brought their daughters over to join the fun.

easterrocksh04-24-11.jpg

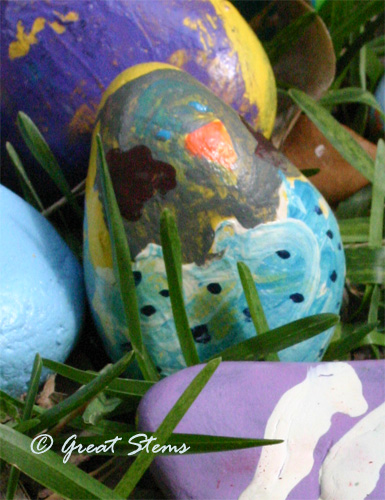
The steps were simple: Get river rocks. Wash river rocks and let them dry. Paint a base color using acrylic paint, then let dry. Paint details using more acrylic paint, letting stages dry. Coat rocks with a sealant that provides some UV protection. As you might guess, this is a multi-day project.

easterrocksi04-24-11.jpg
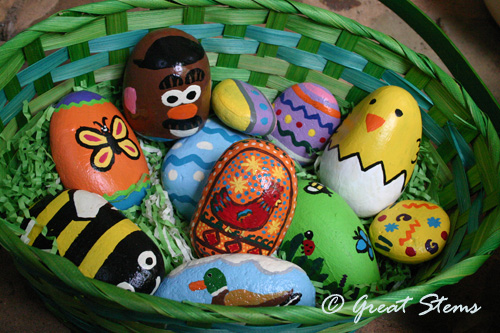
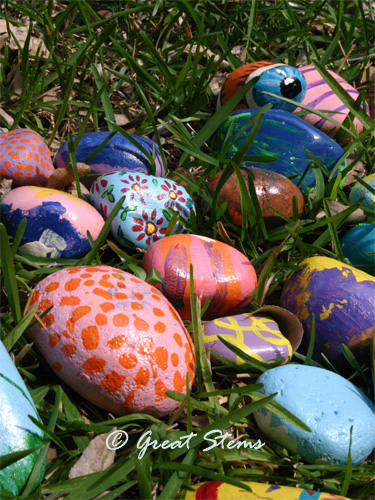
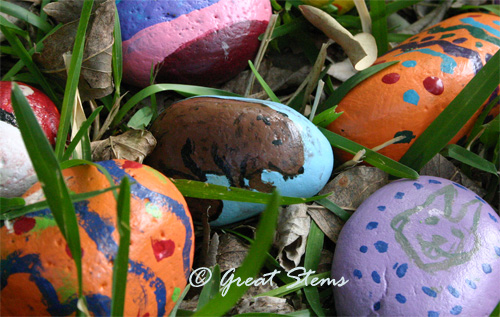
Between our two families, we painted 77 rocks. That's only a mere bucketful, mind you! 

Here are some of our friends' rocks. Note Stepan's eyeball rock in the upper corner. Or rather, note that his rock is noting YOU.

easterrocksc04-24-11.jpg

easterrocksm04-24-11.jpg
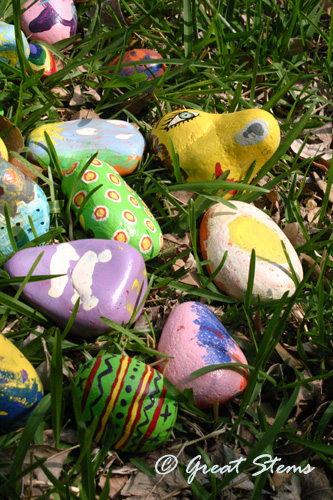
Jennifer's nose rock always had to stop to smell the flowers.

easterrocksd04-24-11.jpg

Young Magda was inspired by their resident cardinal fledglings to paint one.

easterrocksg04-24-11.jpg

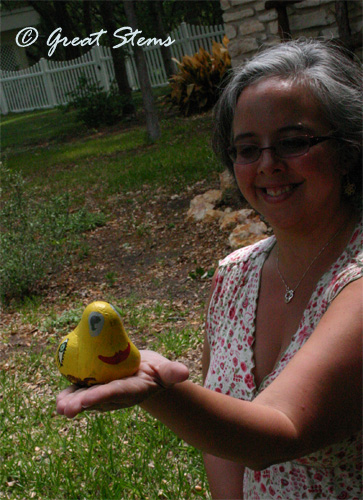
My husband Michael's rock was completely uncooperative, ducking out for a cool bath.

easterrockse04-24-11.jpg

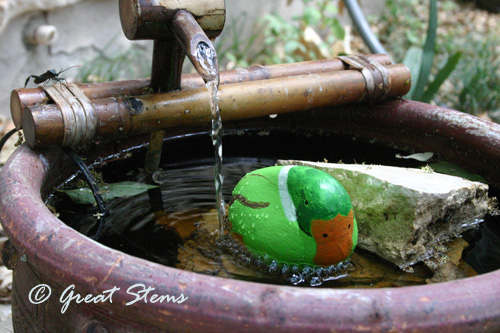
Don't even get me started on all the tasteless jokes Michael's beaver rock inspired.  ><

easterrocksn04-24-11.jpg
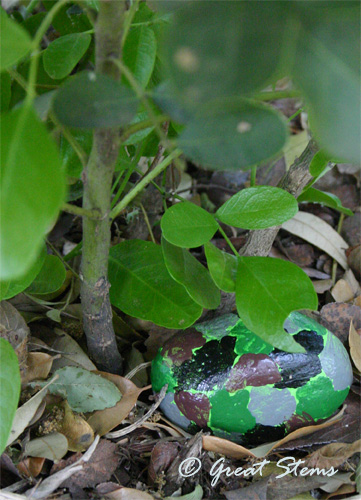
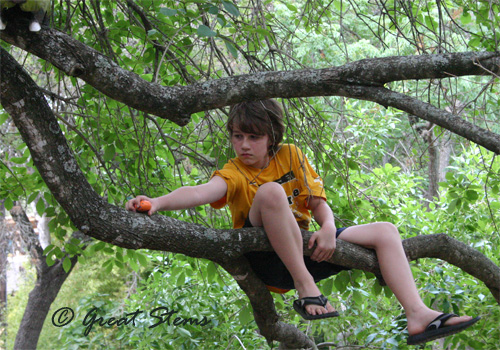
It turns out that rocks can't climb trees, but kids can.

easterrocksq04-24-11.jpgHere's what we learned:

  • Painting rocks is fun for the whole family, even for men who claim that they only sat back at the computer to "let a rock dry."
  • Rocks have character -- you won't find any of them being conformists, like all those eggs out there.
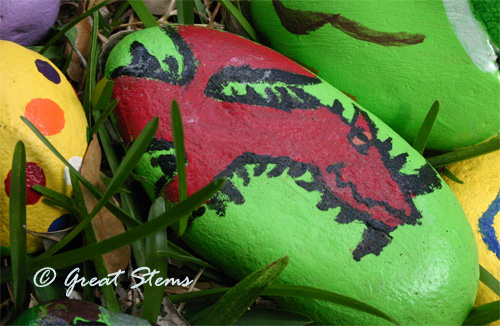
  • Boys are less interested in painting traditional Easter art, like bunnies, chicks, and "pastels" -- but ask for a dragon or camouflaged rock, and they are all over it! You might even get a couple of Pokemon balls.
  • Easter Rock Hunting is just as fun as Easter Egg Hunting, except that you can't eat rocks or they'll break your teeth.
  • Rocks make baskets very heavy or even useless. Thus, we invented Easter Rock Piles.
  • Kids don't appreciate the humor of hiding an Easter Treasure Hunt clue in the dishwasher, making them empty the dishwasher to find it. But parents might appreciate the brilliance of it (for the record, my husband was the mean Easter Bunny clue-writer for that one!).
  • Rocks don't melt like chocolate does. They also don't taste as good.
  • Unlike eggs, rocks don't break if they fall out of your basket -- at least ours didn't.
  • All our Easter rocks rock, but not all of them roll. That's actually a really nice thing -- you can hide rocks in more places than you can eggs, which all roll but not necessarily rock.
  • Easter Rock Hunting is fun to do with your kids, but it's even more special with friends, too. Thank you for being a part of our holiday, S, J, M, S, P, E, J, K, and C!

easterrockso04-24-11.jpg
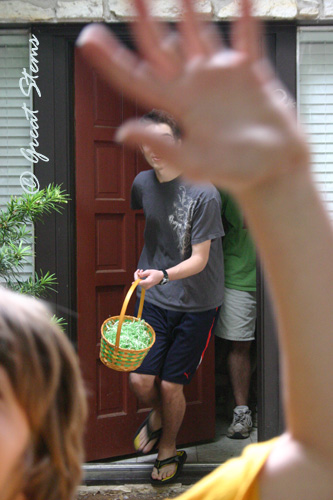
One of the girls at our Easter gathering was concerned that the Easter Bunny really hadn't come to our house. But we showed her proof, as E.B. left a note at our house:

easterrocksp04-24-11.jpg

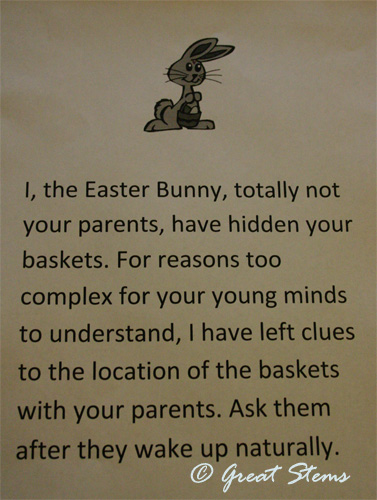
As it turns out, the simplest of clues can completely confuse our too-smart-for-their-own-good children, who apparently read far too much into things. But eventually they found their baskets and were then prepared to participate in the real fun -- hunting ROCKS.

easterrocksf04-24-11.jpg

Hope everyone had a weekend that rocked!

Envy Me My Earth Day Hat

| 10 Comments

Today at school, in honor of Earth Week, the kids donned hats made of reused/recycled materials/trash and had a full-school parade. Well, I just had to have one for the occasion, too. Meet my flowered pillbox hat.

earthdayhat04-20-2011.jpg

Here are the supplies I used:

  • Newspaper
  • Milk jug
  • Aluminum can
  • Paints (I happened to have acrylic on hand for another project we're working on)
  • Paintbrush (I found a use for a foam brush that we've had in our garage for 10+ years)
  • Scissors
  • Glue (I used hot glue to speed up the process)
  • Items to use as circle templates

First, I painted the newspaper and let it dry. I painted the papers pretty thin to conserve paint and because I wanted to show the newspaper print underneath -- this aided in a nice, quick drying time.

earthdayhatb04-20-2011.jpgWhile the paint was drying, I washed the milk jug and cut the lower part off for the hat base (in fact, my son used the upper part for his hat, which I should point out was NOT flowered).

earthdayhatc04-20-2011.jpg

Then I grabbed nearby glasses and paint bottles of various sizes to use as circle templates. I opted for three sizes of circles, the smallest being about the size of a half-dollar coin.

Once I had lots of circles cut out, I arranged them into groups of three, varying the color combinations but always having a large, medium, and small circle in a set.

earthdayhatd04-20-2011.jpgNext, I crumpled up each set of circles into balls then opened them back up. This gave them the flower effect. I stacked and hot-glued each set, then immediately glued each flower to the milk jug. In all, I made 28 flowers, which might sound like a lot but it went fairly quickly.

Finally, I decided to give each flower a center -- my son cut little circles out of an aluminum can for me, then I glued them onto the flowers. And that was that!

earthdayhatf04-20-2011.jpgAnd there's my Earth Day hat. You, too, can have one for the low, low, price of nothing! I wish I could show you all the amazing hats the kids wore at school -- everything from decorated lamp shades to piñata heads to incredible contraptions of aluminum cans, plastic bottles, cereal boxes, plastic grocery bags, and more. So creative!

Making Plantable Ornaments or Cards

| 5 Comments

One of the projects we've been working on at home and with kids at school is making plantable ornaments or cards from recycled paper. Here's a quick and easy way to do this at home. This is a very fun project for both kids and grown-ups!

 pulpornamentf12-09-10.jpgMaterials needed:

  • recycled paper in a variety of colors
  • water
  • blender
  • native wildflower or perennial seeds (because we missed the fall planting season for Texas wildflower seeds, we used perennial seeds that could be planted in spring -- whatever you use, don't pick something that will germinate the moment it touches water!)
  • blender
  • cookie rack or sturdy grid that will allow water to drain through
  • basin in which the cookie rack fits
  • paper-sized piece of window screen
  • cookie cutters
  • piece of damp felt larger than your largest cookie cutter
  • sponge

Tear the paper into bits, separated by color. Add a cup or so of paper bits into the blender and cover with water. Soak for a little bit, then blend. Add more water or paper as appropriate until you have the amount of pulp you want and the pulp is fairly free of chunks. I found it helpful to add a little white paper in with the colors to extend the available colors -- we had far more white available than color; plus, the bits of white give a neat effect to the colors when they are visible.

pulpornamenta12-09-10.jpgOur ornaments needed about 1/4 cup pulp, so we scooped the color we wanted and then added 1/4 to 1/3 teaspoon seeds.

We placed the screen onto the cookie rack and set the rack in the basin. Next we spread the pulp/seed mixture into a cookie cutter, making sure that pulp filled all the corners and edges. The goal here is to use just enough pulp to make a thin ornament -- the thicker it is, the longer it takes to dry (and then you might sprout flowers seedlings!).

pulpornamentb12-09-10.jpg

If you like, add other colors to embellish the ornament.

pulpornamentc12-09-10.jpg
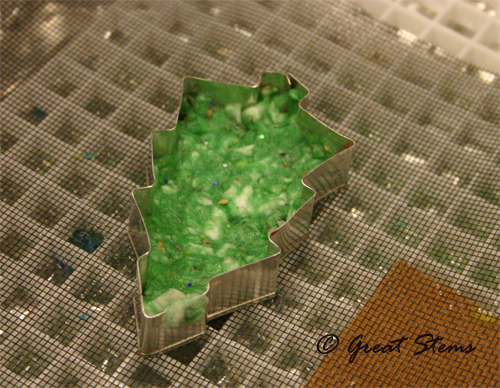
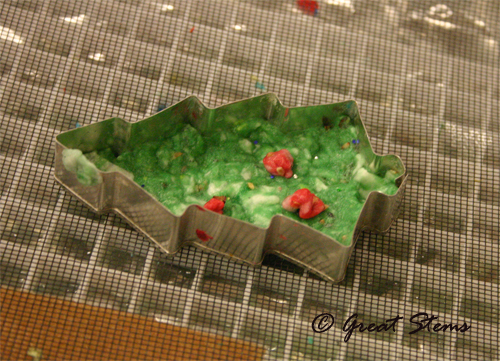
Once you've filled the cookie cutter, gently lift the cookie cutter, pressing the pulp down simultaneously to encourage it to remain on the screen.

Next, take a damp piece of felt and lay it over the ornament. Press down on the felt with the sponge to push out the water from the ornament. Periodically squeeze the sponge off to the side to remove excess water. 

pulpornamentd12-09-10.jpg
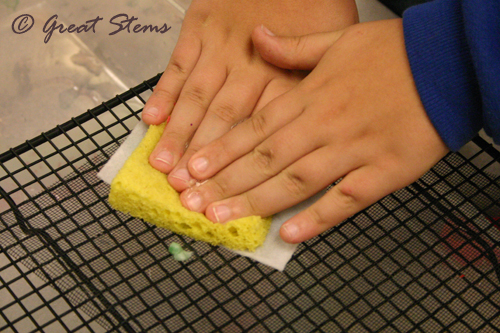
Remove the sponge and felt -- the ornament will be easy to transfer to another rack or screen for drying. Voila!

pulpornamente12-09-10.jpg
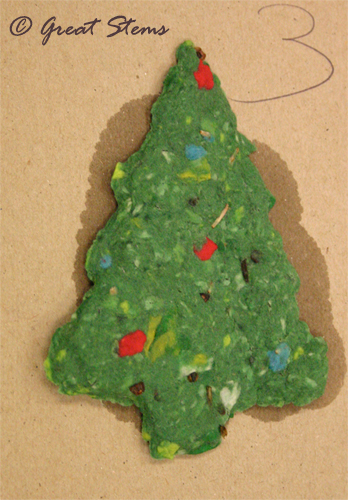
You can use the same process to make a card, with the "ornament" attached to a background piece of paper.

Lizard, Snake, Dragon, Tree

| 2 Comments

In the previous post, I showed different craft ideas using aluminum cans. I can't resist showing a few more pictures of items the kids and I made. Aluminum is so very fun to work with, and it is very inspiring -- there's always more we want to try. Here's a lizard...

aluminumlizard12-08-10.jpg aluminumlizardb12-08-10.jpgAnd a snake...

aluminumsnakea12-08-10.jpg

aluminumsnakeb12-08-10.jpgA dragon embossed in silver...

aluminumdragon12-08-10.jpgAnd a gummy-bear tree.

aluminumtree12-08-10.jpgAluminum can be used to make neat gift tags, too!

Aluminum Can Flowers and Leaves

| 7 Comments

Are your flowers all gone until spring? Can't get flowers to grow at all? Try making some of these colorful recycled creations -- and since they are made from aluminum cans, they're guaranteed to stay pretty for a long, long, long time (just don't step on them).

We're doing a craft activity at school tomorrow, helping kids make holiday gifts out of recycled materials. I've been testing the process -- seeing what kinds of simple things the kids can make with aluminum (we're doing other crafts, too). These flowers, wreaths, and ornaments are super easy to make, and for the younger kids, we can simplify the steps even more. Though I didn't take pictures of my methods along the way, I'm including how-to-instructions below.

aluminumflowera12-07-10.jpg

The above flower was made with six heart-shaped cut-outs, a thumbtack pinning them in the middle, a thin strip coiled and glued in the center, an aluminum can background cut with scalloped scissors, and a piece of scrap wood from our garage. Once you've pinned the hearts together, spread them like a deck of cards and gently work them upward to get the flower shape (also, slightly bend the petal tips back for added effect). The hanger is braided strips from a grocery shopping bag, hot-glued to the back of the wood. 

Aluminum cans are easy to cut with scissors, believe it or not. Make a small hole with the scissors, then cut the top and bottom of the can off. A single slice down the side reveals a nice rectangle to work with. To take away the curl, just lightly drag the rectangle along a table edge in the opposite way of the curl.

Materials needed for these projects:

Aluminum cans
Scissors

Glue (tacky or hot-glue)
Something to put your artwork on, such as magnets, craft sticks, scrap wood, old CDs
String, twine, strips of shopping bags, raffia, or yarn (or even paper-clips, for hanging purposes)
Old ballpoint pen without ink

Also useful:
Thumbtacks
(depending on the project)
Die-cut punches (I used a 1-inch circle shape and medium-sized heart shape -- found at craft stores)
Scalloped-edged scissors or similar
Hole punches
Ruler
(for making quick, straight folds)
Toothpicks, pencils, or other objects to coil foil around

I did have to purchase the thumbtacks, but everything else I had on hand. You don't have to use die-cut punches but it is soooo fast and works on aluminum very well -- it's nice when you need lots of consistent shapes. Alternatively, create a template on some thin cardboard and trace the outline repeatedly onto the aluminum, then cut the shapes out by hand. I also now have some purchased magnets, so the kids and I will probably have some fun with those.  

aluminumflowerb12-07-10.jpg

This flower was made with five one-inch circles glued to a sixth circle "base." To get the 3-D effect, simply gently bend the petals upward and give them a slight backward bend at the top of the petal. Coil a strip for the stem and another for the flower center, and make some simple leaves. 

Keep in mind that any of these flowers can easily be used to make a magnet, planter garden (on craft sticks, etc.), or a bouquet. There is also a large variety of can colors out there -- you can modify your design to make sunflowers, mums, etc. I intend to experiment with this, too, but I didn't have any other colors on hand.

Here is a very simple flower, something the younger kids might have an easier time with.

aluminumflowerc12-07-10.jpg

The petals are 1-inch circles, and the stem is made of strips. The petals can be glued flat, and kids can either cut out leaf shapes or make the coiled ones shown in the picture. To make the quilled leaves, cut a thin strip of aluminum and coil it tightly (perhaps around a toothpick), giving a gentle pinch at one end. You can also make entire flowers from quilling strips of foil.  

Ornaments are super easy to make and very satisfying. They look great on a tree with lights and have the bonus of being "double-sided." 

aluminumornaments12-07-10.jpgTo make the leaf ornaments, simply trace a leaf shape onto the aluminum and cut it out (creating a cardboard template is great for repeated uses). To create a fold, press a ruler over half the leaf shape, along the midline, then gentle fold up the uncovered side. Use a non-working ballpoint pen to create the veins -- voila, easy but very effective texture. You can also use scalloped scissors to give additional leaf effects (see wreath below). The star ornament is just a basic star cut-out; the 3-D effect is made with straight folds from every point, with gentle pinching to guide the shape as shown. The holly ornament is made from simple cut-outs of hand-drawn leaves and berries; it's glued to a paper clip.


The leaves can be used to make a beautiful wreath, glued to an old CD.

aluminumleaveswreath12-07-10.jpgYou can see the scalloped edges on the leaves here -- what a difference it makes -- very much like leaves found in nature. A hot-glue gun made this a fast craft, but tacky glue should work fine. The CD is used silver-side up.

My boys are doing aluminum can crafts of their own, from ornaments to dragons to snakes. I hope to be able to share photos. And today I'm working on plantable seed ornaments made from recycled paper, working to make the process kid-friendly and easy. Stay tuned for more earth-friendly holiday projects!

History Lesson, Part II -- Pokeweed Ink

| 10 Comments

A couple of months ago, my son and I had great fun making Pokeweed Ink from the pretty but toxic Pokeweed plant. We made the ink and let it ferment in a dark cabinet and then promptly forgot about it.

pokeweedinkd09-13-10.jpgBut making the ink proved to be fortuitous, as recently my son was given a Social Studies research project at school -- of all the colonies, he ended up with Pennsylvania, the state in which both the Declaration of Independence and the Constitution were written. The rumors around the Internet were that these documents were written in Pokeweed Ink. (Edit: These proved to be inaccurate, however -- thanks to Dana R., we know from the National Archives that iron gall ink was actually used. Iron gall ink was the ink of choice for many, many centuries -- I'm going to have to experiment again!)

pokeweedinka11-28-10.jpgMy son's been working hard on his report and presentation on the Pennsylvania colony, and we remembered that we had that bottle of pokeweed ink, which luckily was still in good shape -- apparently it fermented well (in fact, it smelled like either really old grape juice or very, very cheap wine). Whether a historically accurate ink or not, he could use it to create a document of his own.

pokeweedinkb11-28-10.jpg
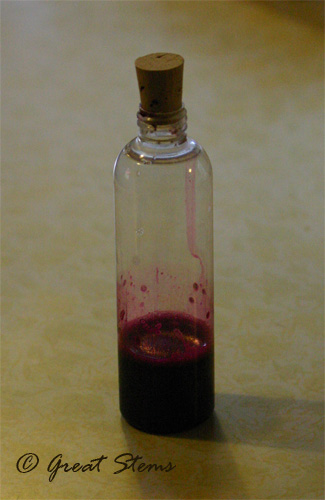
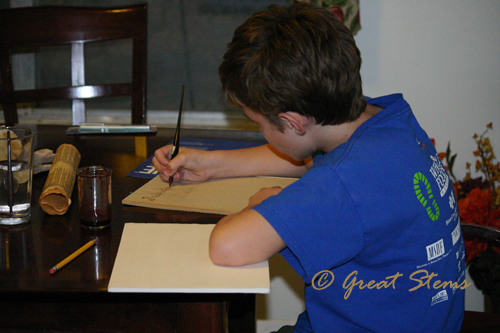
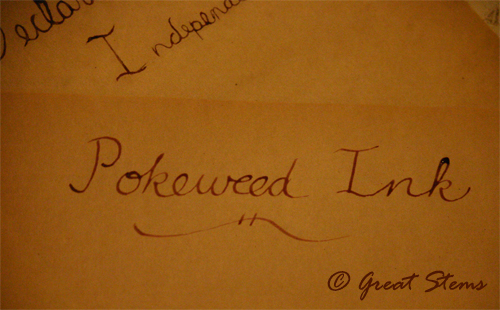
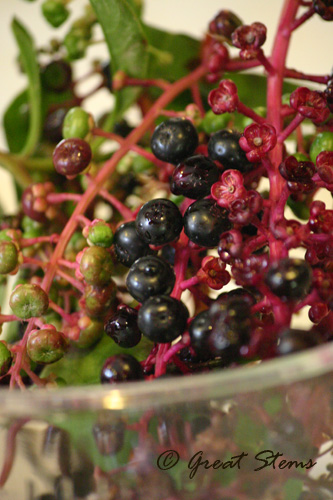
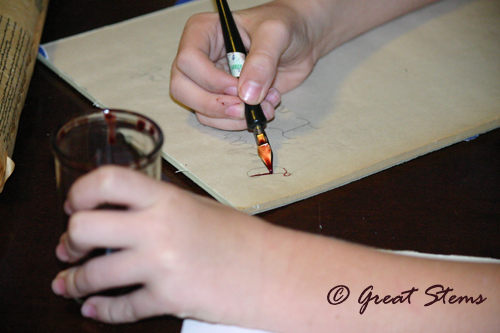
So today we had fun practicing calligraphy with both modern pens and with pen nibs dipped in the pokeweed ink. It's a lot harder than it looks, using a nib dipped in ink -- a modern calligraphy pen is so much easier, alas. But it's not as cool as using ink the old-fashioned way! However, for this particular project, we realized that doing any fancy writing wasn't really going to work, so my son stuck with cursive writing.

pokeweedinkc11-28-10.jpgMy son prepared a sample Declaration for his presentation. He also took the bottle of ink with him to school. Science, history, art, fun!

pokeweedinkd11-28-10.jpg

What's pretty neat, too, is that as the ink dries, the color darkens from the reddish look in the "Pokeweed Ink" text above to the darker in shown in the writing in the corner. Nifty, nifty! 

Rock Star

| 7 Comments

My oldest son made this statue for our front bed garden. I absolutely love it, and I love watching my kids get inspired to create things for and from nature. Statue Man will be our new garden guardian!

rockstatue10-14-10.jpgWhat's neat is that he also provides cover for little lizards and toads. Just perfect for this wildlife habitat.

I've been working on our two-year garden update, now a few days overdue. It's prompted some necessary clean-up around the yard. And all the plants we bought this last weekend have to go in the ground first, too. But I can't wait to get it all done. Our garden has grown, and I can't wait to show it off!

I invite you to check out my other post today at Beautiful Wildlife Garden -- all about personalizing your haven by recreating what you enjoy out in a natural habitat.

History Lesson -- Making Pokeweed Ink

| 23 Comments

roughszh09-05-10.jpgI've recently learned to recognize pokeweed, and wouldn't you know it, it's on our school campus (the picture above isn't from school; it's from a recent visit to McKinney Roughs). Well, shortly the plant won't be at the school any longer. All parts of it are considered highly toxic to humans, and for our kids' safety, the plant has to go (it was right by the Kindergarten wing, as well). I apologize to the nearby birds -- I'll plant three more berrying plants in my own yard just to make up for it. It's such a shame -- what a great native wildlife plant.

I did get the pokeweed berries off right away, since they might look enticing to a hungry youngster or foolish adult, and I'll pull the whole plant out very soon. Then I did what any good mom would do -- I took the poisonous berries home right away to do a project with my kids. No, not that kind of project... geez!

pokeweedinka09-13-10.jpgAccording to multiple sources, fermented pokeweed ink was used to write the Declaration of Independence, as well as letters during the Civil War. (Edit: Thanks to Dana R., who contacted the National Archives and found out that the Declaration and the Constitution were written in iron gall ink -- this means another ink-creating experience awaits me!) Native Americans used the berry juice to decorate their horses and dye cloth, and even used it for war paint. But given that the toxins from the juice can be absorbed through the skin, you won't find me recreating that part of history.

What did appeal to me, however, was making ink. I donned gloves and carefully crushed them to all sorts of juicy greatness.

pokeweedinkb09-13-10.jpgI then strained the mixture through pantyhose into a funnel (this last part was cool -- with my gloves on and all the red juice squeezing out from the stained lump, I looked like a surgeon massaging a heart -- granted the heart was about the size of that of a chicken, but still it was c-o-o-l cool). And from the funnel, the juice flowed into a small bottle.

pokeweedinkc09-13-10.jpgNext I added a pinch of yeast to the liquid to help it ferment. I'm keeping the liquid out of the sun, too, so that it doesn't turn brown right away from the UV rays. That cork is just there for show right now, as I need to let the gases escape during fermentation. 

pokeweedinkd09-13-10.jpg

I'm going to teach the kids a little calligraphy, I think, to go along with the ink. Hopefully in a few days I'll get to update the ink report with sample writing. What fun! (EDIT: My son ended up using the ink for a nifty visual for his Social Studies project on the American colonies.)

Note: I talked to a teacher about making this a lesson for the Social Studies classes at school, but the timing was all wrong for either studying about Native Americans or the later American history. Perhaps if I still have ink, I can share it with them then. Or maybe I'll be able to find some more pokeweed berries elsewhere and enjoy another project.

Pods of Justice

| 11 Comments

Last spring I was given a bunch of poppy pods for arts and crafts projects. Months later, they were still sitting in the same bag. So the kids and I decided to create a poppy head army for our container plants.

podsa08-24-10.jpg

Pod Power!

podsb08-24-10.jpgOur pod soldiers are as cool as they are powerful. Superheroes, even! They protect our castle with determined focus and fair justice.

podsc08-24-10.jpg
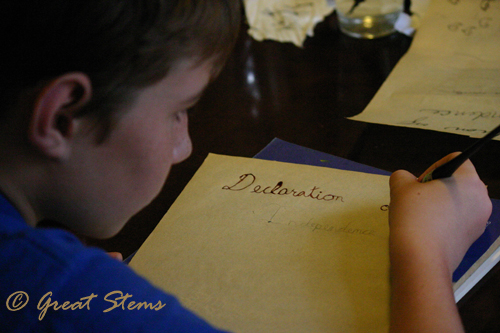
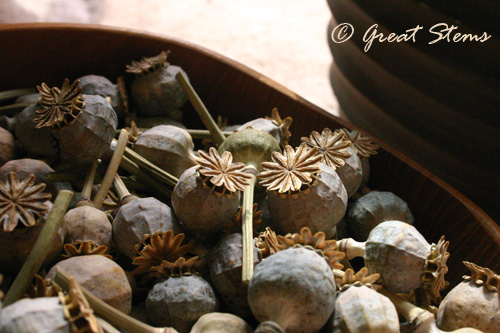
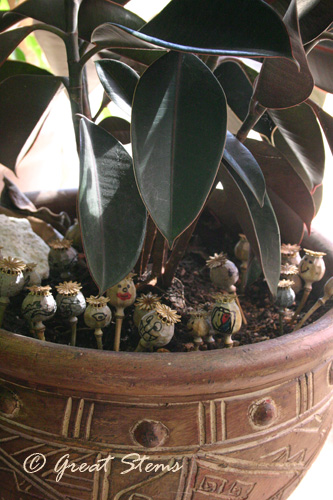
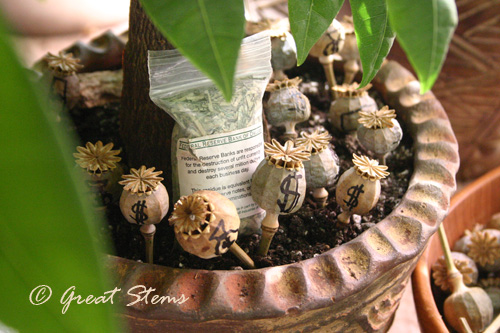
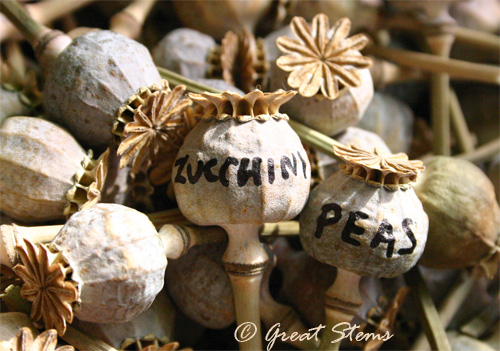
They stay planted in their belief that goodness will always prevail.

podsf08-24-10.jpgThey encourage hope and inner peas to grow, and they root out evil.

podsg08-24-10.jpg
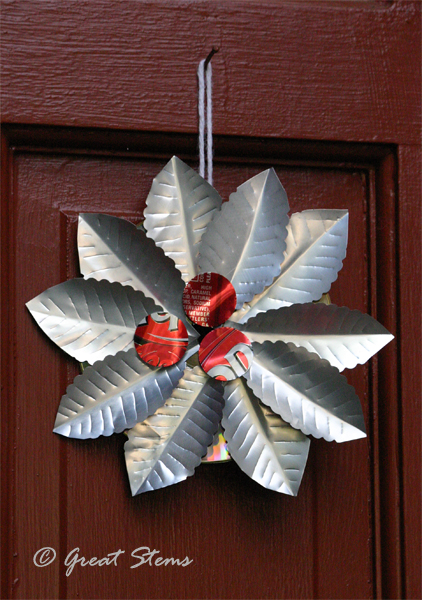
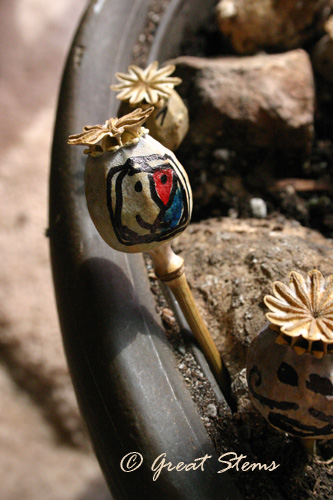
Most importantly, they defend our indoor plants from the villainous doings of alternative-litter-box-seeking kitties. Yes, they are anti-poop poppy pods.

podsd08-24-10.jpg

Security pods defend the treasure of the Money Tree.

podse08-24-10.jpg

Nanny pods will watch over the growth of young seedlings in the nursery each season (thanks, Bonnie, for your great suggestion).

podsi08-24-10.jpg

Nay, the tenacious tendrils of evil will not take hold in this home. Poppy pods, you are the light against the shade. Away, all seedy characters! The Pods of Justice reside here! First inner peas, then World Peas! Just think of all the other good that could stem from this.

          podsj08-24-10.jpg  Little buds, such defenders of good, welcome to the family. May you never leaf us.

podsk08-24-10.jpg

Sit on it, Potsie

| 13 Comments

pottya08-05-10.jpgOh, Happy Days!

I finally got around to painting this old wooden chair I picked up at a consignment store years ago. We called it an antique commode chair for years -- whether that was its original purpose, we have no idea!

For us, it's been both a plant holder and a cat bed. I used to keep an ivy in it, letting the vines twine around the seat-back posts. But while painting it, the kids and I decided it would be a perfect spot for our young Golden Barrel Cactus.

pottyb08-05-10.jpgWhen this cactus gets big, it's going to be a painful pin cushion, that's for sure.

I'm still deciding whether I want to add other colors to the potty chair besides the purple, as was my original intention. I like the way the cactus stands out with the purple as is, so I might just wait awhile.

Now to figure out where to put it!


Meredith
Meredith O'Reilly happily
gardens for wildlife in
Austin, TX. She enjoys
educating people of all ages
about native flora, fauna,
and healthy environments.


Nature Blog Network


categories

Powered by Movable Type 4.21-en
OpenID accepted here Learn more about OpenID